Changelog
Here are the latest product updates from EasyRoutes. If you have feedback or suggestions, please reach out — we'd love to hear from you!
Here are the latest product updates from EasyRoutes. If you have feedback or suggestions, please reach out — we'd love to hear from you!
Version 1.0.92 of the EasyRoutes Delivery Driver mobile app is now available to download for iOS and Android devices. This release features additional enforcement logic preventing proof of delivery attachment removal from stops marked as completed or attempted, as well minor bug fixes and performance improvements.
.webp)
We've launched an additional set of translations for the EasyRoutes Delivery Driver mobile app, which will be automatically applied for users with their primary device language configured to Dutch or German. All in-app functions - including buttons, labels, notifications, and settings pages - will now automatically translate to match either of these device languages, in addition to the previously announced French and Spanish translations.
Drivers will need to update their version of the mobile app to 1.0.91 or above in order to access these two new automatic app translations. For more details on translating customer-facing communications (including email notifications, tracking pages, and packing documentation) to match your store's language preferences, see this support article.
Version 1.0.91 of the EasyRoutes Delivery Driver mobile app is now available to download for iOS and Android devices. This release features support for automatic Dutch and German app translations, as well as minor improvements and bug fixes.
Note: Drivers will need to update to the latest version of the app (v1.0.91 or above) in order to take advantage of these two new automatic app translations and overall improvements within the EasyRoutes Delivery Driver mobile app.
We've made a series of adjustments to the EasyRoutes admin interface to provide a more seamless experience when working across the app. As a result, some EasyRoutes functions have moved to a new location or received an updated visual treatment.
When selecting orders/stops using the checkboxes on the Orders and Routes pages, the Actions menu (which previously appeared at the bottom of the page) has been moved to the upper right-hand corner of the table. This change affects Add to map functionality (as shown below) as well as any bulk order/route actions across the app:
.webp)
On the Orders page, orders that have already been added to the map now display with a shaded background to indicate this, like #1149 and #1145 below:
.webp)
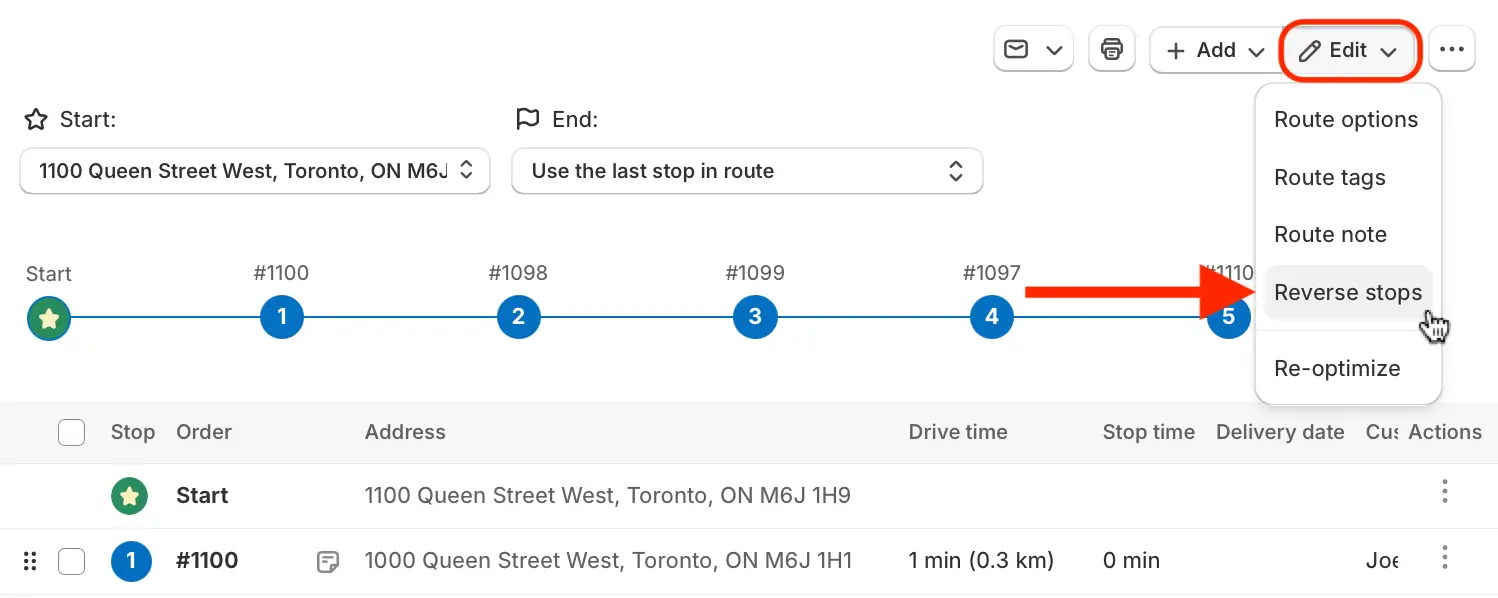
The Reverse stops button/function (previously found above the table checkboxes on a Route page) can now be found in the Edit menu when viewing any route:
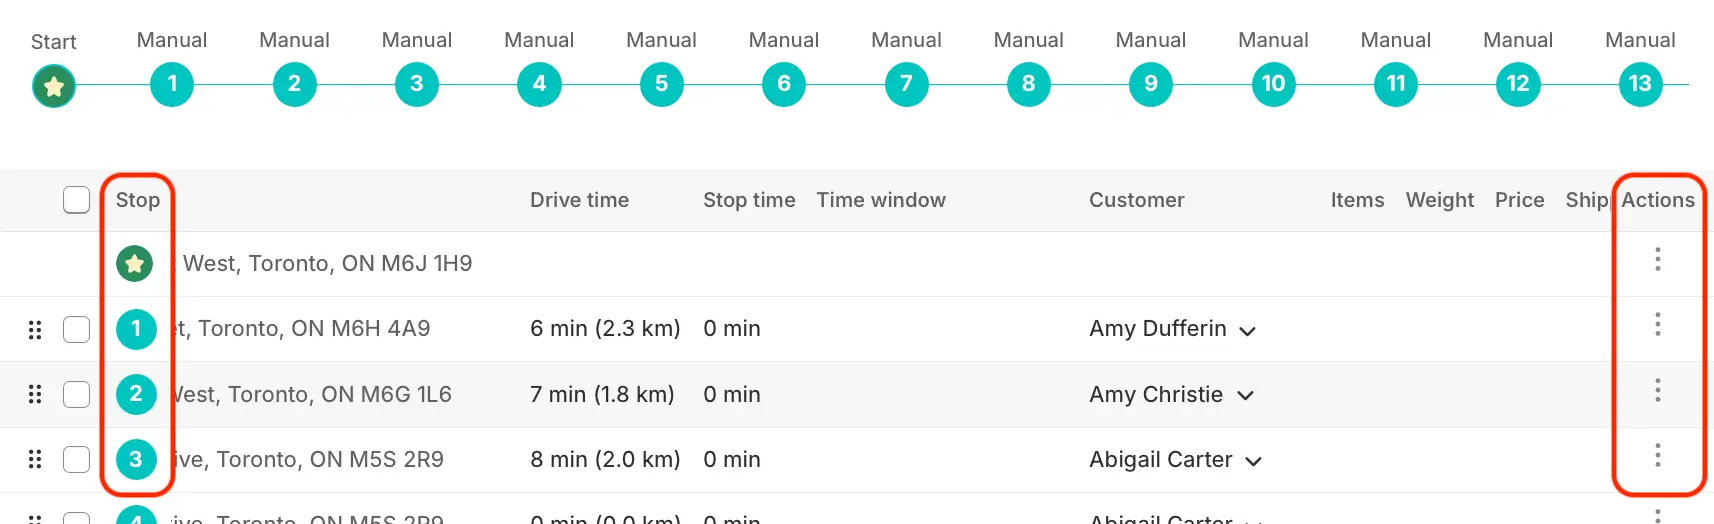
The Order column (on the Orders page), as well as the Stop column and Actions column (on Route pages) are now "sticky" and will remain on screen when scrolling horizontally across these tables, increasing clarity and accessibility when working with wide tables:
Similar to the Orders & Route pages, when using the checkboxes to select drivers on the Drivers & Vehicles page, the Actions menu (used to activate, deactivate, or delete drivers) has shifted from the bottom of the page to the upper right-hand corner of the Drivers table:

We've launched an initial set of translations for the EasyRoutes Delivery Driver mobile app, which will be automatically applied for users with their primary device language configured to French or Spanish. All in-app functions - including buttons, labels, notifications, and settings pages - will now automatically translate to match either of these device languages.
Drivers will need to update their version of the mobile app to 1.0.90 or above in order to access automatic app translations. For more details on translating customer-facing communications (including email notifications, tracking pages, and packing documentation) to match your store's language preferences, see this support article.
Version 1.0.90 of the EasyRoutes Delivery Driver mobile app is now available to download for iOS and Android devices. This release features support for automatic French and Spanish app translations, Android performance improvements, and minor bug fixes.
Note: Drivers will need to update to the latest version of the app (v1.0.90 or above) in order to take advantage of automatic app translations and overall improvements within the EasyRoutes Delivery Driver mobile app.
Version 1.0.88 of the EasyRoutes Delivery Driver mobile app is now available to download for iOS and Android devices. This release features improved support for extended text strings in stop notes, as well as minor fixes for eSignature capture and proximity warnings impacting a small subset of users.
Version 1.0.87 of the EasyRoutes Delivery Driver mobile app is now available to download for iOS and Android devices. This release features minor bug fixes and performance improvements throughout the app. Users should not experience any noticeable impact when interacting with the app compared to the previous version.
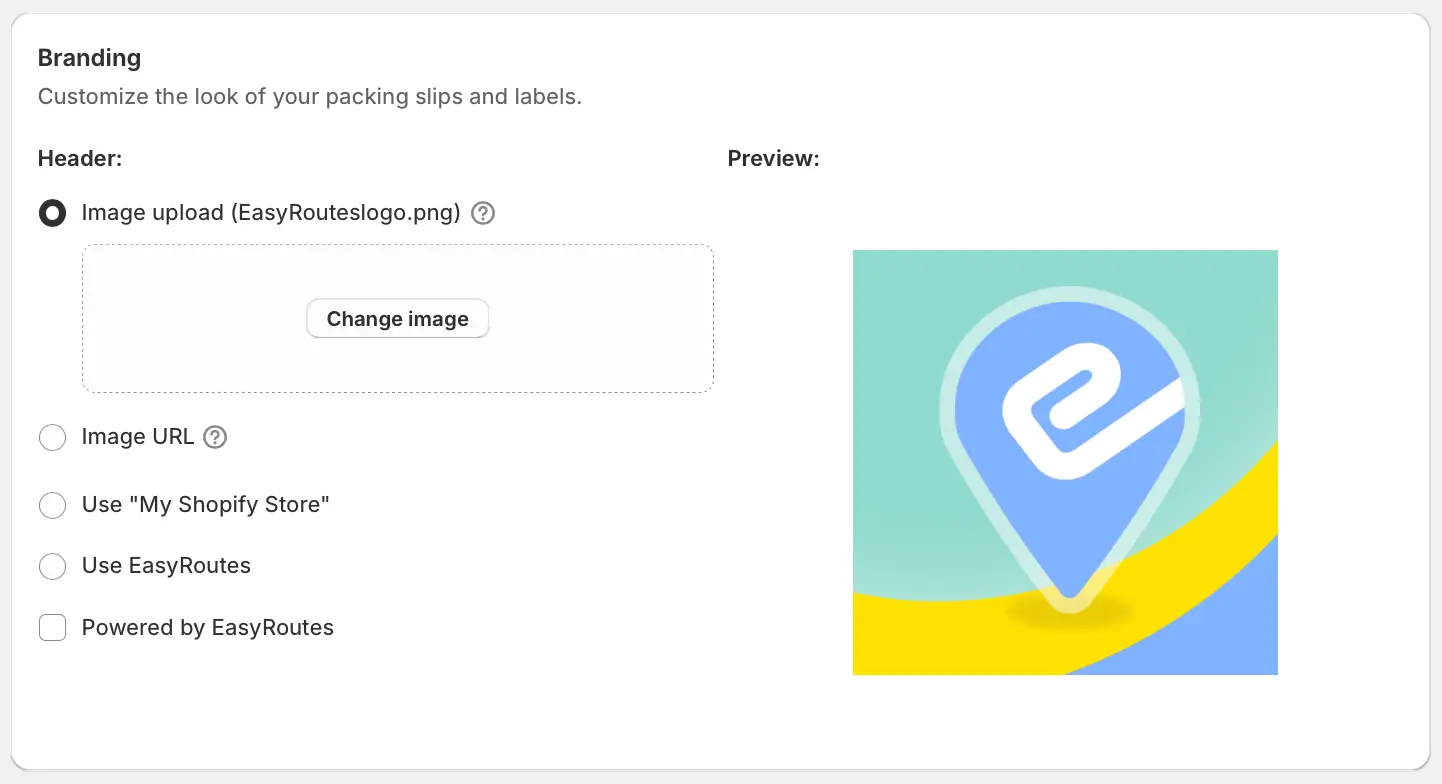
We've added a new setting for customer communications, allowing users to directly upload logo image files for display on order tracking pages, customer email notifications, and packing slips/labels. Logo image files can be uploaded individually for each of these document types for maximum flexibility across each document's layout.
Logo files uploaded via any of these new settings are hosted by EasyRoutes, and no longer require external hosting in order to include on any of these document types. JPG, GIF, and PNG file formats are accepted, up to a maximum image size of 5MB.
Configure and upload logo files from the Branding section (shown above) of the Order Tracking, Customer Notifications, and Packing Slips & Labels tabs found within your EasyRoutes Settings.
Version 1.0.86 of the EasyRoutes Delivery Driver mobile app is now available to download for iOS and Android devices. This release features a number of updates and improvements, including:
Note: Drivers will need to update to the latest version of the app (v1.0.86 or above) in order to take advantage of these improvements and new features within the EasyRoutes Delivery Driver mobile app.
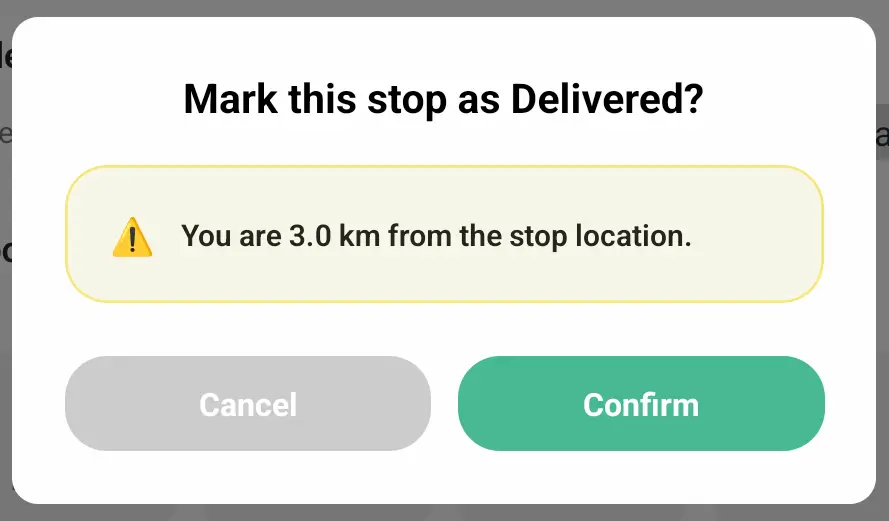
We've added a new warning when marking stops as Delivered or Attempted from the mobile app, alerting drivers when their current GPS location is not in close proximity with a stop's configured geolocation. Drivers can tap the Cancel button to verify location accuracy before trying again, or tap the Confirm button to bypass the warning and proceed to update the stop's status.
Any proximity warnings displayed in the mobile app will also be retained for route planner review, accessible alongside the delivery location tracking proof of delivery item from the EasyRoutes admin view.
Drivers will need to update to the latest version of the mobile app (v1.0.86 or above) in order to take advantage of this new feature. GPS proximity warnings are enabled by default, and can be disabled from the mobile app's settings menu by turning off the Warn when updating a stop from far away toggle.